
Last Updated on June 6, 2024 by lindseymahoney
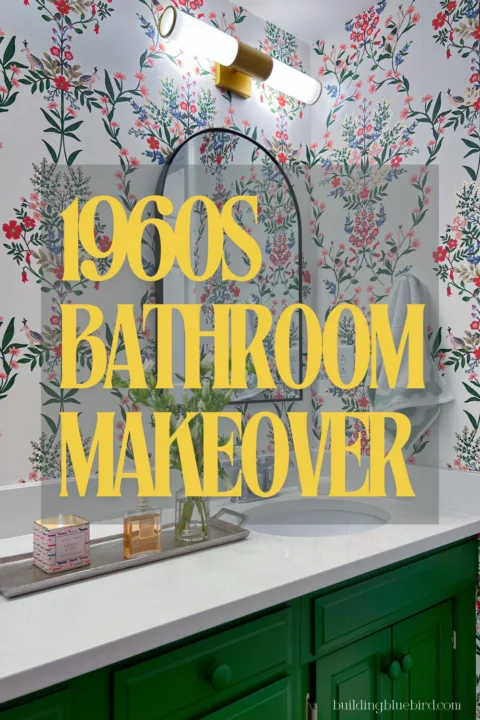
The kids’ 1960s bathroom makeover is complete and I am so pleased with the result! This bathroom renovation began with an unexpected leak behind the shower tile and was not exactly planned. As a homeowner, these surprises can happen and sometimes you have to roll with the punches and work with what you can.

Transforming a dated space into something fresh and vibrant doesn’t always require a complete overhaul. Luckily, I can get pretty scrappy and find creative solutions to save money in these types of situations and that is just what I did! One of the biggest money saving tricks is taking on DIY projects instead of hiring a contractor and paying for labor.
Let’s go through the bathroom updates!
Table of Contents
- 1960s Bathroom Makeover Before and After
- 1960s Bathroom Makeover Details
- Bathroom Source List
- Embracing the Blue Bathtub
- Fresh Shower Tiles
- New Wallpaper
- Bold Green Vanity
- Brightening Floor Tiles
- New Bathroom Light Fixtures
- Accessories for Fun and Function
- 1960s Bathroom Makeover Final Thoughts
- More Content You Will Love
1960s Bathroom Makeover Before and After
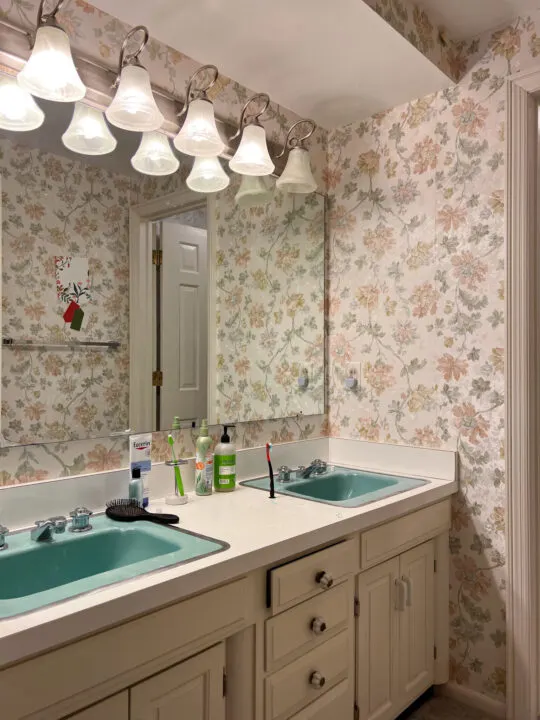
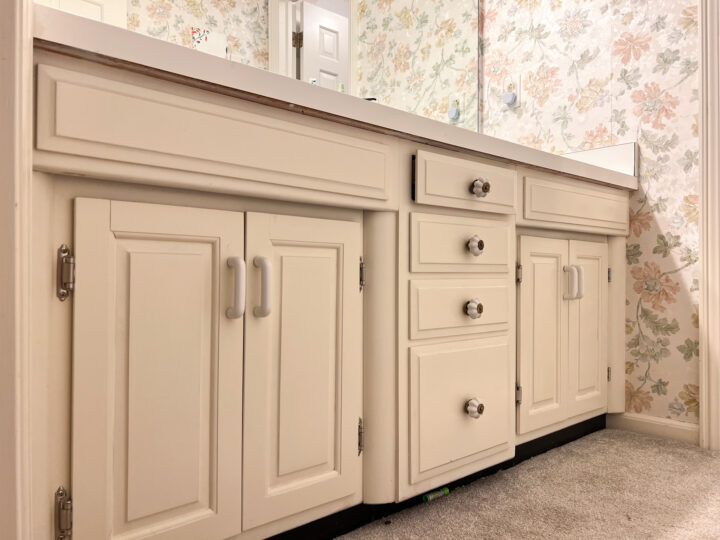
Here is a reminder of the bathroom vanity area before the renovation.

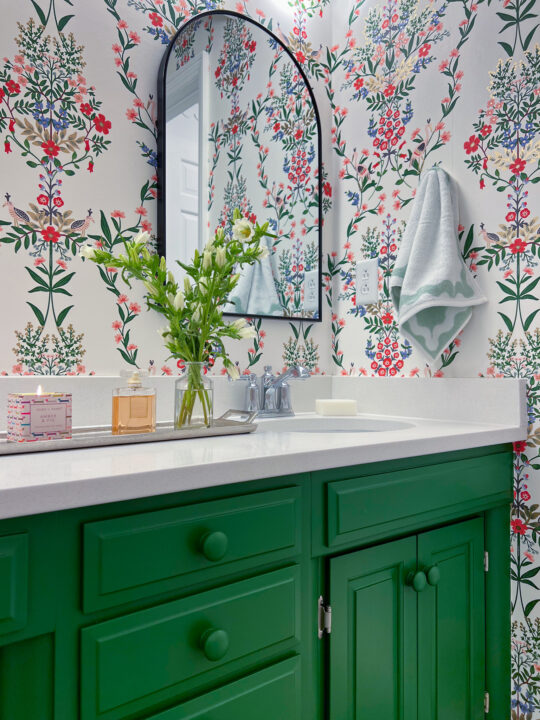
And here is that same angle of the bathroom vanity after the makeover!

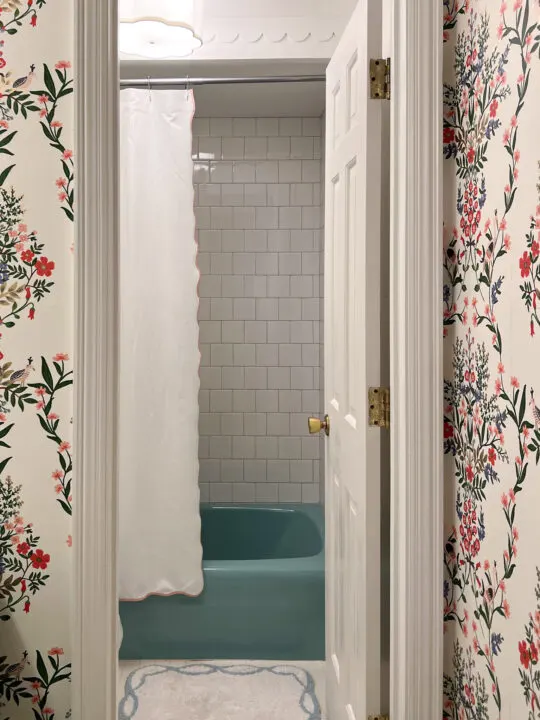
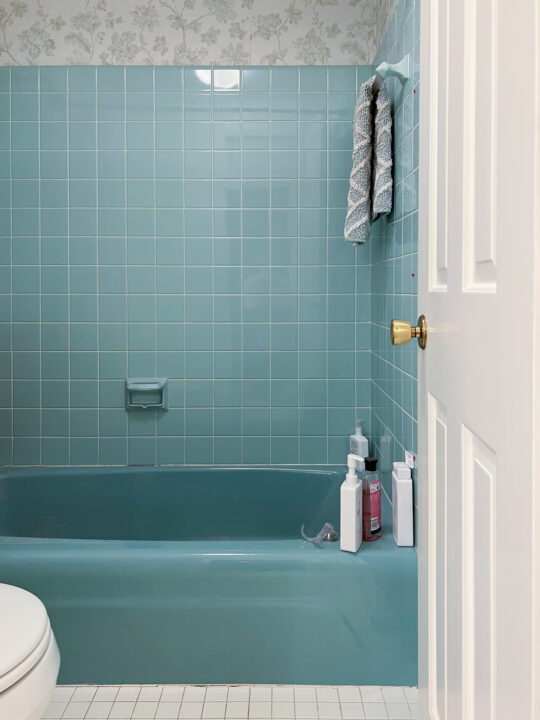
The shower and toilet are in a separate room from the vanity and I really love the original blue tub and tile. Because we had to remove the tile to repair the leak, I knew that I wanted to keep the mid century blue tub and incorporate it into the design.

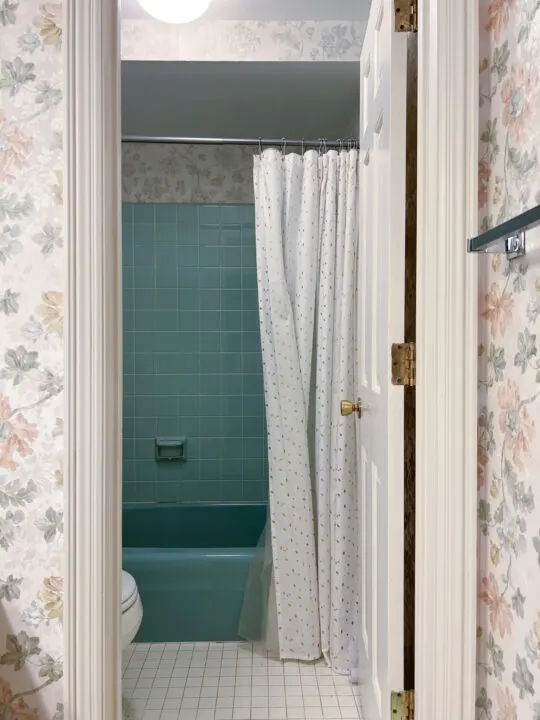
Here is that same view after the bathroom makeover!

1960s Bathroom Makeover Details
[Affiliate links are included in this blog post at no additional cost to you. Thanks for supporting Building Bluebird!]
Whenever I put together a design plan for a room, I always consider how I want the room to feel and how it will be used. Because this is the kids bathroom, I knew that I wanted to incorporate color and a little bit of whimsy into the design.
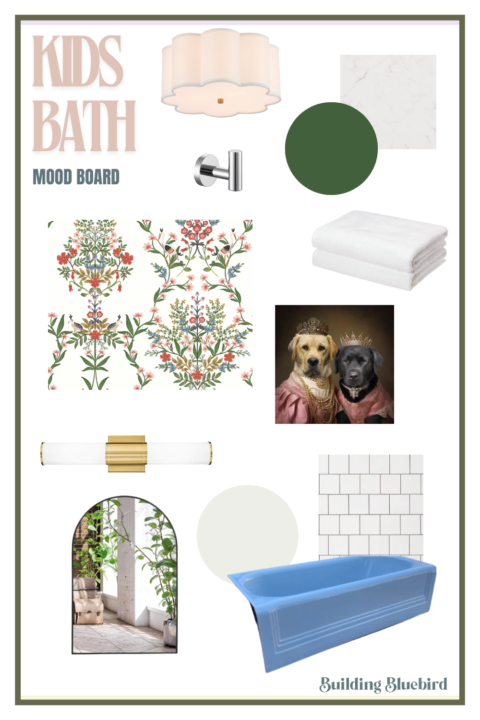
Bathroom Source List

- Rifle Paper Co Wallpaper – Luxembourg
- Dog Portrait Artwork
- Sconce (2) and Light Bulbs
- Mirror (2) – similar
- Scalloped Ceiling Trim
- Shower Curtain – similar
- Scalloped Ceiling Light
I also plan to highlight some of the original features of this 1960s bathroom that stays true to the traditional design aesthetic of our home. The last thing I wanted to do was plop a modern bathroom design into this mid-century home.
Embracing the Blue Bathtub


One of the standout features of my 1960s bathroom is the original blue bathtub. Rather than replacing it, which would have been costly, I decided to let it serve as a nostalgic centerpiece. The blue bathtub adds unique character to the space that sets the tone for the rest of the bathroom.
Fresh Shower Tiles
The biggest project on the list was replacing the shower walls around the tub. Once the leak was fixed, we hung the waterproof shower walls and installed the shower tiles.
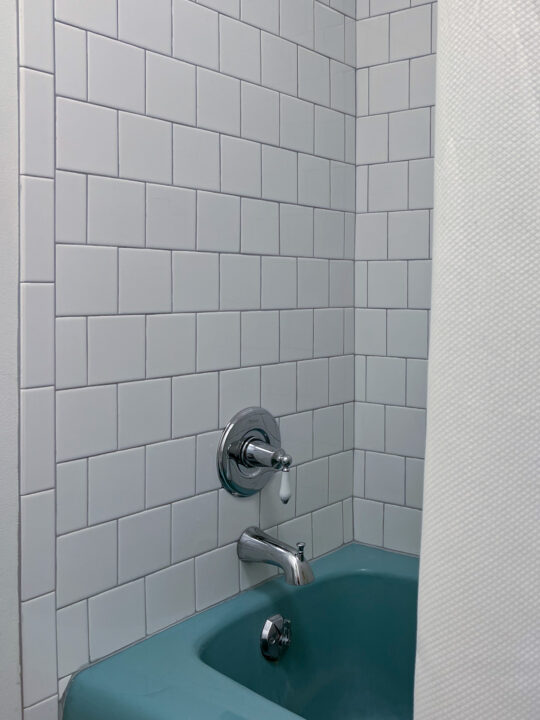
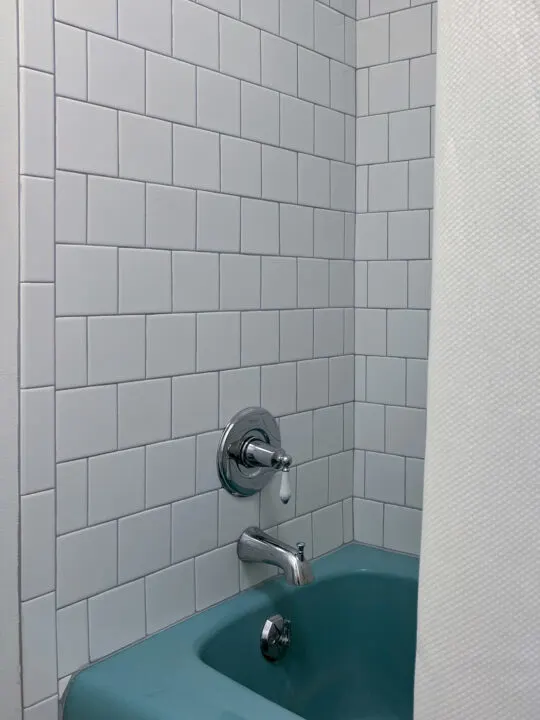
I chose a white, ceramic tile that was the same shape as the original blue tiles and gave it a slightly modern twist with the offset running bond pattern. The square, white tiles create a cohesive look that ties beautifully with the blue bathtub.
*Check out the complete tutorial for tiling a shower surround here!
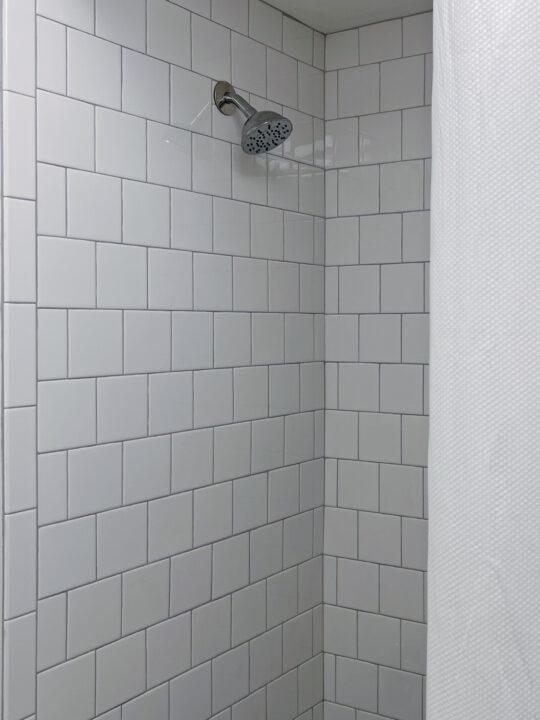
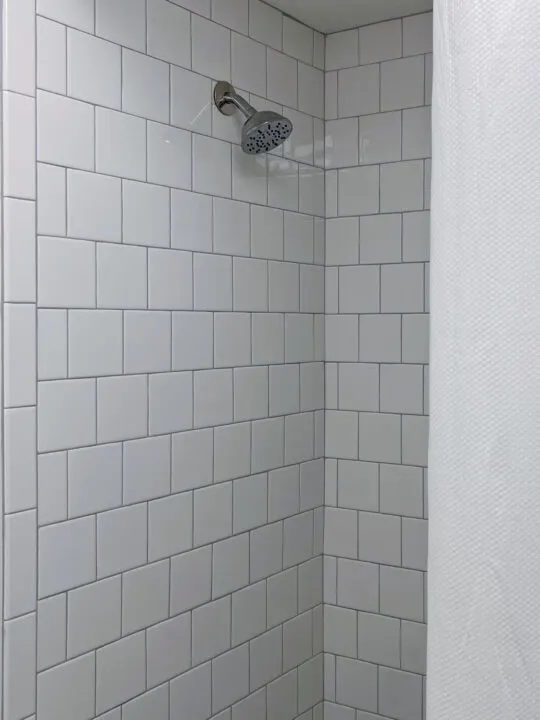
With the new tile installation, I added a few new features to the shower surround. First, I ran the tiles up to the ceiling instead. Second, I installed a shower niche on the back wall of the tub surround to hold shower essentials.
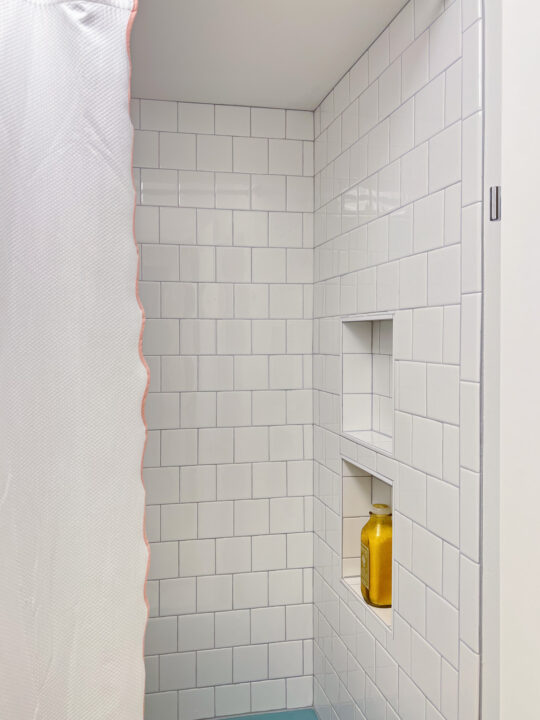
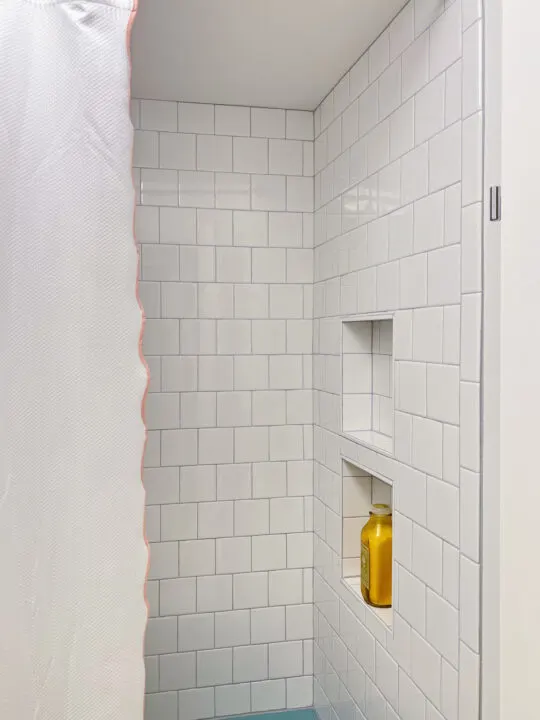
Before, all of the soap bottles sat around the edge and there was not enough storage. Now we have two separate shower shelves to store all of the kids’ items.
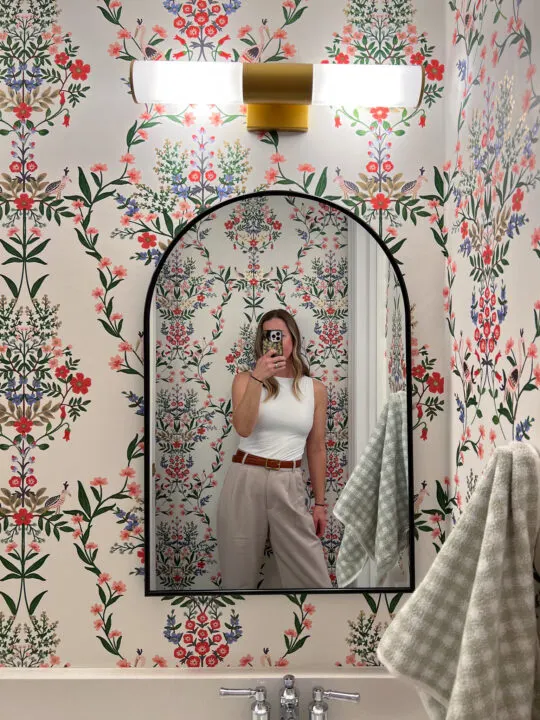
New Wallpaper
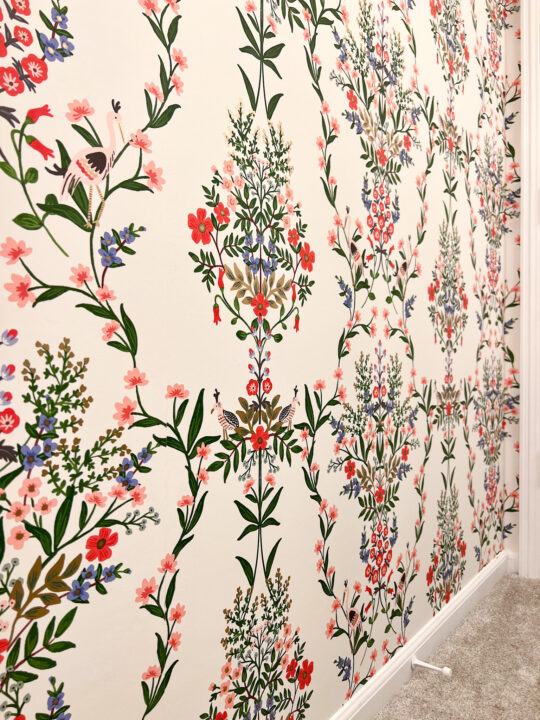

I have had my eye on this wallpaper pattern for a few years now and am thrilled I finally used it! It is called Luxembourg and is made by Rifle Paper Co. This was the inspiration for all of my design decisions in the bathroom.

Originally, I planned to hang wallpaper only on the wall across from the bathroom vanity, but once I began installation, I knew it had to go on all of the walls. Wallpapering the entire vanity room adds so much more personality to the bathroom.
This is one instance where I am glad I didn’t let my penny-pinching self win! I purchased an extra roll of wallpaper to complete the bathroom which cost an additional $150. Worth it!
TIP: If you have to purchase more wallpaper rolls after the original purchase, you can provide the batch number in the new wallpaper order so that the coloring stays consistent.
*Check out the best way to remove wallpaper in your home with this blog post.
Bold Green Vanity
The vanity in the bathroom is original to the home and you can definitely see the 1960s flare with its design. The bathroom vanity cabinet is built into the three walls and sits flat on the floor with carpet installed up to the base.
It sits lower than standard vanities built today, which I like because it is the perfect height for the kids.
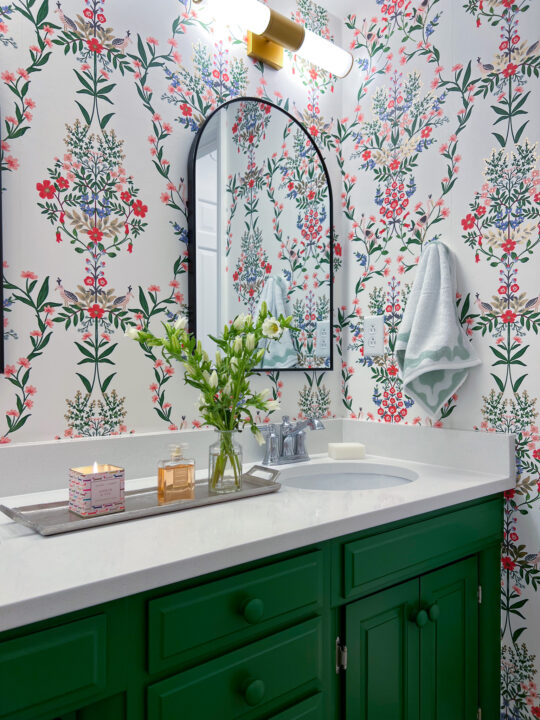

While the blue sinks are fun, we decided to replace them when we replaced the countertop. A simple white quartz countertop gave this vanity a modern and fresh new look without sacrificing the original vanity cabinet. This was the most expensive part of the renovation because the vanity is a custom size.

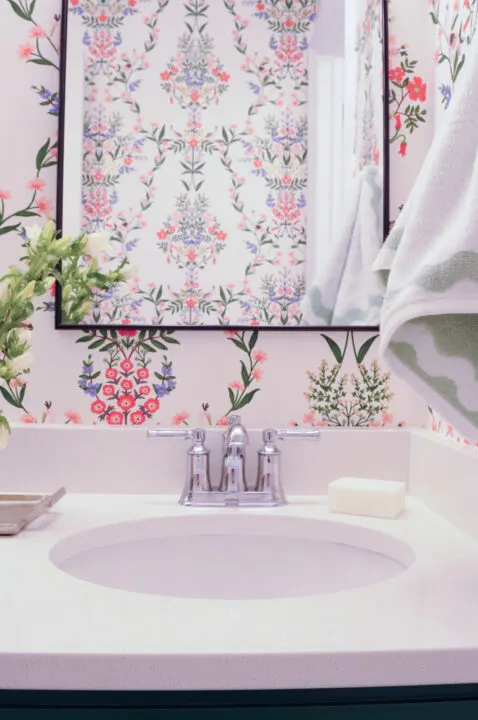
We replaced the old sink fixtures with new, chrome fixtures and they look beautiful with the new countertops.
To choose the perfect paint color for the vanity, I took a sample of the wallpaper and chose a green that closely matched the leaves. The knobs were also replaced with round, wooden knobs and painted the same color.
The green paint color is Arugula, by Sherwin Williams, and I am so pleased with how it looks on the bathroom cabinet!
The green vanity now stands as a vibrant focal point in the bathroom. This pop of color not only modernizes the vanity but also makes the entire space feel more welcoming and fun for the kids!
Brightening Floor Tiles
With so many decisions in this bathroom and the costs adding up, I decided to keep the flooring as is…for now! My thought process is that I can always change the flooring later.
Of course, I don’t love having carpeting in the vanity room, but these are the decisions we have to make on a tight budget!


I did however give the tile floor in the shower/toilet room a little refresh. First, I mixed up a DIY grout cleaner and removed all of the dirt from the white grout. The grout color was still a bit dull, so I tried a new product called Grout Renew.
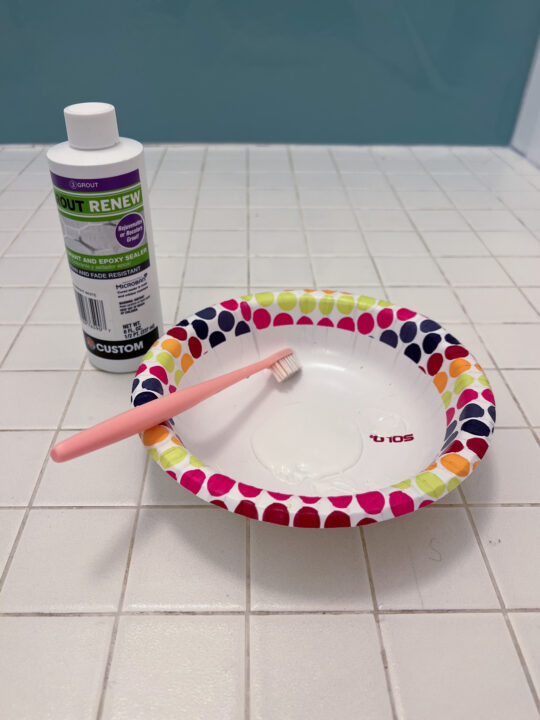
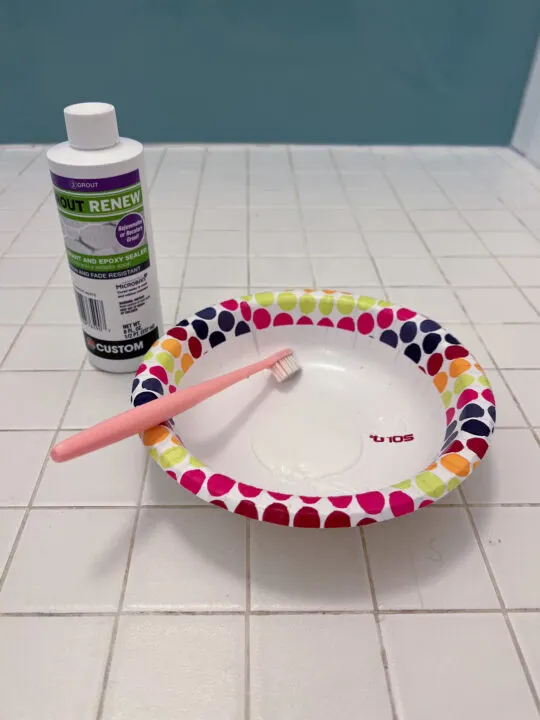
Using a toothbrush, I scrubbed the grout with this liquid and essentially painted it white.
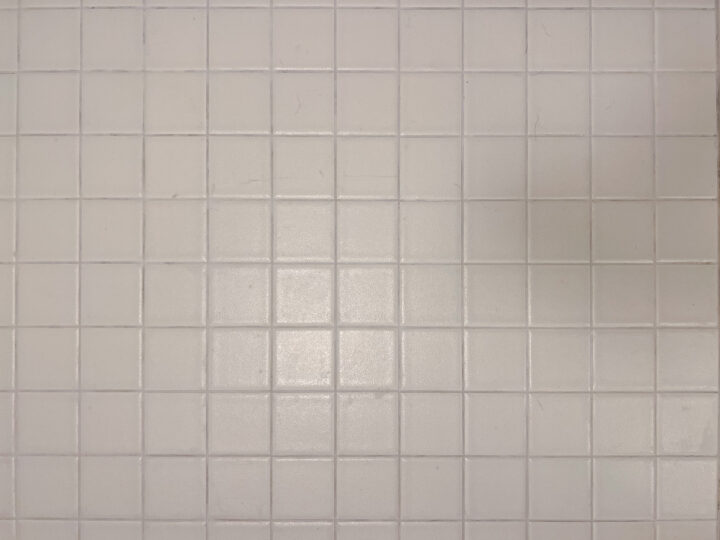
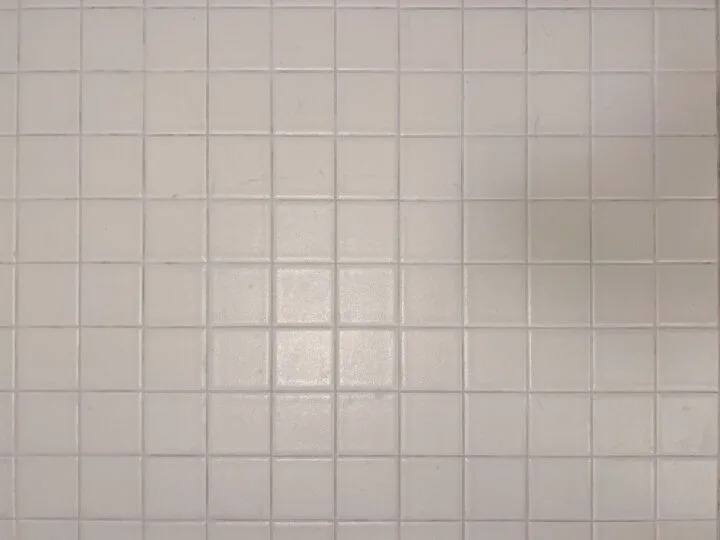
This was a great budget-friendly glow-up for the old floors. We will see how it holds up, but this was such a great fix for floor tile that needed a little love.
New Bathroom Light Fixtures
When we removed the light fixture over the vanity, I decided to replace it with two sconces over each sink. This required a little electrical work and drywall repair, but with my father-in-laws help with electrical and my drywalling work, the cost was minimal.
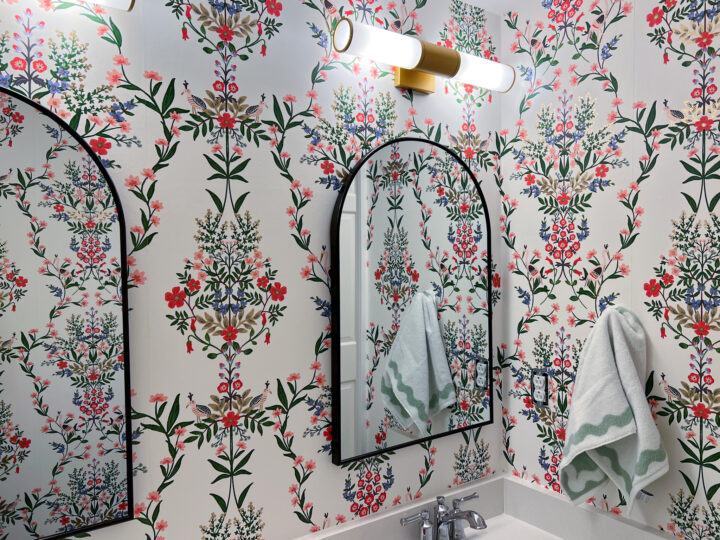

The light fixtures have a gold/brass finish and are a mid-century style, perfect for our bathroom!

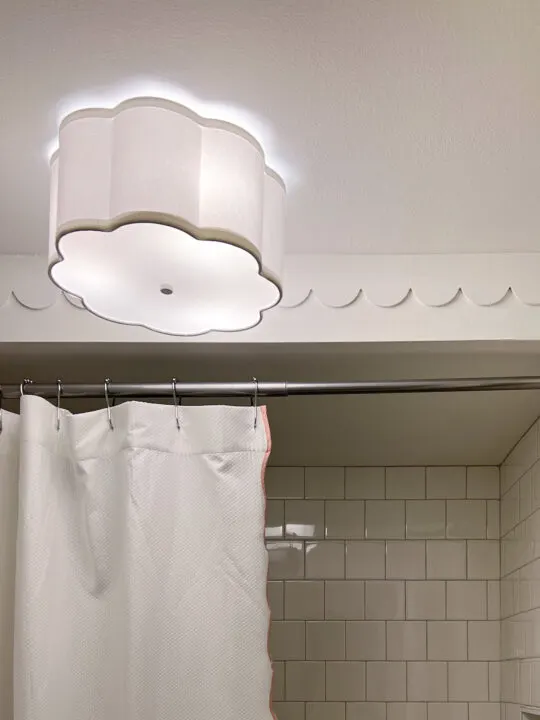
In the shower/toilet room, I replaced the old ceiling light with a new light that has a scalloped shade. The curves of the light fixture match the curves of the scalloped shower curtain and ceiling trim.
With white walls, white tile, and white floors, I wanted to find a few ways to subtly add whimsy to this space. I installed scalloped trim around the ceiling and painted it the same color as the bathroom walls – I used Pure White by Sherwin-Williams.
*Check out more fun ways to add scallops to your home decor here!
Accessories for Fun and Function
No bathroom makeover is complete without the right accessories. To tie everything together, I added a few budget-friendly yet stylish items:
- Bright Towels: Coordinating with the green vanity and the colors in the wallpaper, I chose hand towels in coordinating hues that add to the room’s cheerful vibe.
- Playful Art: I hung fun and quirky artwork that appeals to kids and adds personality to the walls.
- Storage Solutions: To keep the bathroom organized, I incorporated trays to corral beauty products and containers for bath storage like bath bombs!
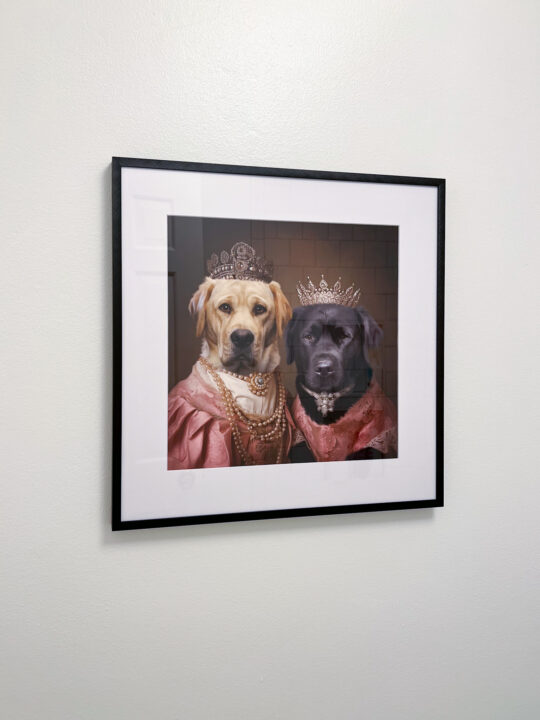
Our family pups recently passed away and I thought the kids would love a custom portrait hanging in their bathroom! The Luxembourg wallpaper has a regal feel to it, so I thought a portrait of our two labs posing as Queens was necessary. Hanging fun and quirky artwork is a great way to add personal touches to a space.
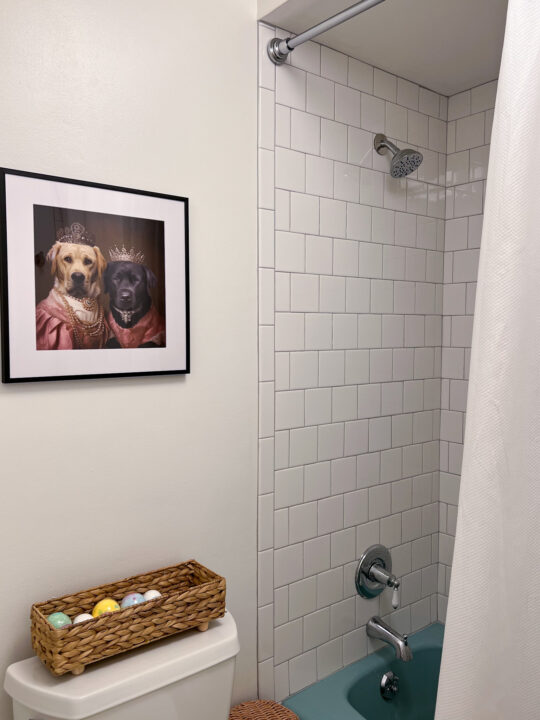
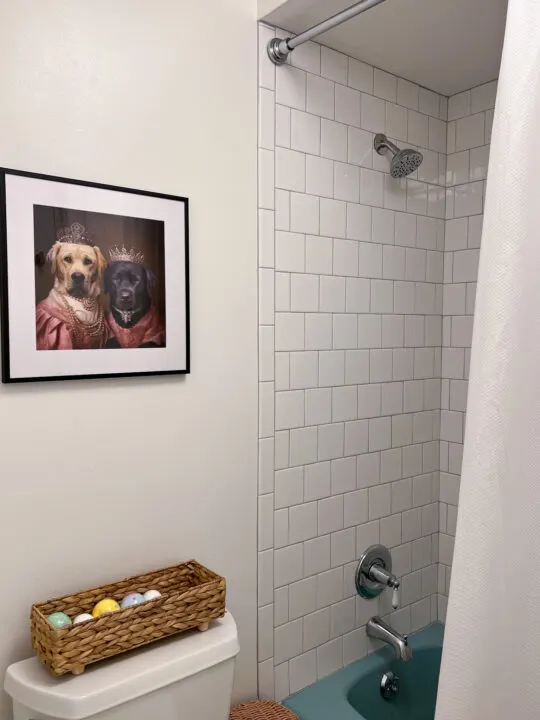
On the back of the toilet, a woven container holds bath bombs that my daughter loves to use in her baths.
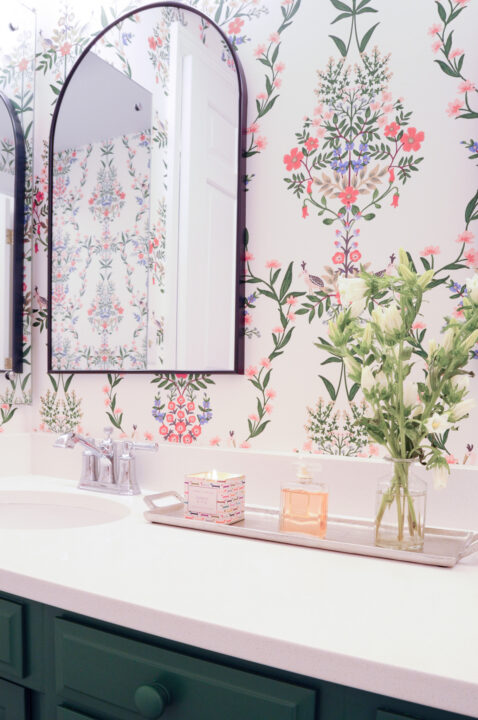
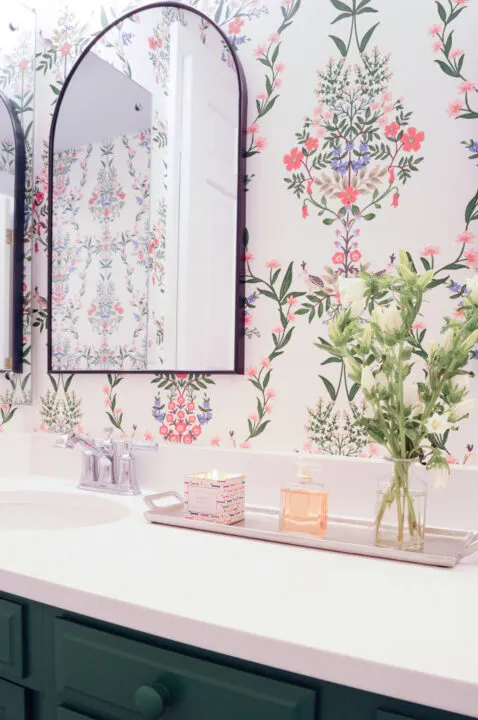
On the vanity, a tray to corral odds and ends is always a great way to stay organized. Fresh flowers and a candle add ambiance to a beautiful bathroom.
1960s Bathroom Makeover Final Thoughts
The end result is a bathroom that perfectly balances fun and nostalgia. By keeping the blue bathtub and giving new life to existing features, I managed to stay within budget while creating a space that my kids love. The green vanity and colorful wallpaper inject energy and playfulness into the room, making it a lively and engaging environment for bath time.
This makeover proves that with a bit of creativity and some strategic updates, it’s possible to transform an outdated space into a delightful and functional area without breaking the bank. If you’re considering a budget-friendly renovation, remember that sometimes the charm of the original elements can become the highlight of your new design.
Embrace the unique features of your space, add pops of color, and let your imagination run wild—just like I did with my 1960s bathroom makeover.